


How to Install Vertical Sliding Windows?
The installation of vertical sliding windows involves several critical steps: measuring the window opening, preparing the area, removing the old window, fitting the new window, sealing it properly, and finishing with trim. With the right tools and careful attention to detail, you can achieve a professional-looking installation. However we recommend you to hire a professional for a hassle-free installation. Our team will look after everything according to your need.
Do You Have a Custom Project?
Book a free consultation to find the perfect windows and doors for your home.
FREE QUOTE REQUESTDetailed Installation Steps
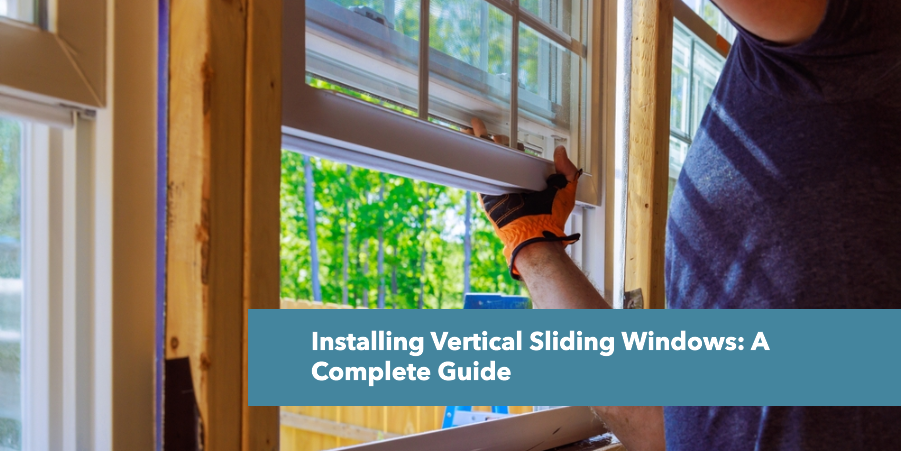
Step 1: Measure the Window Opening Accurately
When you’re ready to install vertical sliding windows, the first step is accurate measurement. Measure the width and height of the window opening at three different points (top, middle, and bottom for width; left, middle, and right for height) to ensure your new window will fit snugly.
The smallest of these measurements should be used for ordering the window to avoid any fitment issues. For example, if your measurements range from 48 to 48.5 inches in width and 60 to 60.5 inches in height, order a window that matches the smallest measurements, i.e., 48 inches wide and 60 inches tall.
Step 2: Prepare the Window Opening
Next, prepare the window opening by removing the old window. Carefully take out the sashes and any remaining parts of the old window frame. Ensure the opening is free from debris, old caulk, or paint, which could interfere with the new window’s installation.
Check for any signs of rot or damage around the opening. If you find any, repair them before proceeding. The window opening should be square; check this by measuring diagonally from corner to corner. If the measurements differ by more than 1/8 inch, you may need to adjust the frame.
Step 3: Install the New Window Frame
Install the new window frame into the opening. Begin by dry-fitting the window to ensure it fits properly. Apply a generous bead of silicone caulk around the perimeter of the exterior window stop to create a weatherproof seal. Insert the window into the opening from the exterior, positioning it so that it’s centered and level.
Use a spirit level to check that the window is plumb (vertically aligned) and level (horizontally aligned). If necessary, use shims to adjust the window’s position. Secure the window frame with screws; most manufacturers recommend using screws that are at least 2.5 inches long to penetrate the window jamb and framing studs effectively.
Step 4: Fit the Window Sashes
After the frame is securely in place, install the window sashes. Most vertical sliding windows have a tilt-in feature for easy installation and cleaning. Begin with the lower sash, tilting it slightly to fit into the track, and then tilt it upright into its operational position. Repeat the process for the upper sash. Test the movement of each sash to ensure smooth operation.
Step 5: Insulate Around the Window Frame
Once the sashes are installed, apply insulation around the window frame to enhance energy efficiency. Use low-expansion spray foam insulation to fill gaps between the window frame and the rough opening. This insulation helps to prevent air leaks and maintain the home’s thermal envelope. Trim away any excess foam once it has fully cured.
Step 6: Install Interior and Exterior Trim
The final step is to install the interior and exterior trim. On the interior, attach the window casing using finishing nails, ensuring a tight fit against the wall. On the exterior, apply the exterior trim or cladding and seal the edges with a high-quality exterior-grade caulk to prevent water infiltration. Ensure that all seams and joints are sealed properly to maintain the window’s weatherproofing and energy efficiency.
Important Data and Measurements for Installation
| Installation Steps | Description |
| Measurement Accuracy | Measure window width and height at three points each; use the smallest measurement. Ensure the window opening is square with no more than 1/8-inch difference in diagonal measurements. |
| Window Frame Installation | Use 2.5-inch screws for secure anchoring; apply silicone caulk around the perimeter for a weatherproof seal. |
| Insulation Application | Use low-expansion spray foam for gaps around the window frame; reduces air leaks and enhances energy efficiency. |
| Trim Installation | Secure interior casing with finishing nails; seal exterior trim with high-quality exterior-grade caulk.” cell |
How to Install AC units in a Vertical Sliding Window?
Installing an air conditioner in a vertical sliding window requires a unit designed specifically for this type of opening. These units are typically taller and narrower than standard window air conditioners. The installation involves measuring the window, securing the unit with brackets, and sealing any gaps to prevent drafts and maintain energy efficiency. However we recommend you to install from a professional for effortless installation.
Step 1: Choose the Right Air Conditioner
To install an air conditioner in a vertical sliding window, you first need to select a unit that fits the dimensions of your window. Vertical sliding window air conditioners are typically between 15 to 20 inches wide and 20 to 35 inches tall. To ensure a snug fit, measure your window opening in both width and height. For instance, if your window measures 18 inches wide and 32 inches tall, you should look for a unit that fits within these measurements.
These units are designed to exhaust hot air outside while cooling the inside of your home, so it’s crucial to choose the right size for effective cooling. An improperly sized unit can lead to inefficient cooling or increased energy consumption. As a general guideline, for every 500 to 600 square feet of room area, you should look for an AC unit with a capacity of 12,000 BTU (British Thermal Units).
Step 2: Prepare the Window Opening
Once you have your AC unit, the next step is to prepare the window opening. Fully open the vertical sliding window and clean the frame to remove any dirt, dust, or debris that could interfere with the installation. It’s essential to have a clean and dry surface for securing the unit and creating an airtight seal.
Step 3: Install the Support Bracket
Vertical sliding window AC units typically require a support bracket to hold them securely in place. Most units come with an adjustable support bracket that extends 4 to 6 inches beyond the window sill. Position the bracket according to the manufacturer’s instructions, making sure it is level. Use a drill to secure the bracket with screws provided in the installation kit. The bracket should be able to support the weight of the air conditioner, which can range from 40 to 80 pounds depending on the model.
Step 4: Position the Air Conditioner
Carefully lift the air conditioner and place it on the support bracket. Ensure that the AC unit is centered within the window opening and that the bottom of the unit is securely resting on the bracket. The front of the AC unit should face inside, and the back should be outside to allow for proper ventilation and exhaust. Lower the upper sash of the window to rest against the top of the air conditioner, securing it in place.
Step 5: Secure the Unit and Fill Gaps
With the AC unit in position, extend the adjustable side panels or brackets that come with the unit to fill the gaps between the AC and the window frame. Secure these panels to the window frame using screws or adhesive strips to prevent any movement. This step helps to block out insects, dust, and outdoor air. Use foam weatherstripping or insulation strips to seal any remaining gaps around the unit. Proper sealing is essential to prevent drafts and maintain energy efficiency. Studies have shown that proper sealing can improve the unit’s efficiency by up to 15%.
Step 6: Plug in and Test the Air Conditioner
Once the unit is secured and all gaps are sealed, plug the air conditioner into a grounded electrical outlet. Make sure the outlet is capable of handling the electrical load of the unit to prevent overloading. Turn on the air conditioner and check for any vibrations, noises, or drafts that could indicate improper installation. Adjust the unit or brackets as needed to ensure smooth operation.
How do you make vertical windows slide easier?
To make vertical sliding windows slide more easily, you need to ensure that the tracks are clean, lubricate the moving parts and you can use silicone-based lubricant spray. Avoid using WD-40 or other oil-based products as they can gum up over time. check for any misalignment or damage.
